|
There are currently no product reviews.
 ;
Print was clear and easy to read. Thank you Joe joeoldaudio
;
Very great deal. In a few minutes a have the manual, that I needed. Thanl you very much
;
Manual was complete. Received it quickly. No problems
;
Product was very good. Received quickly and complete
 ;
The Sony AV-3600 service manual was what I needed for the repair of this unit
Thanks for the good service
Dave
32PD5000/42PD5000/37PD5200 (PW1)
Item Vs and Va VOLTAGE ADJUSTMENT 32PD5000, 37PD5000, 37PD5000 Procedure (1) If the difference between the printed voltage of Vs and the indicated value of Vs Voltmeter is over 0.1V, adjust the Vs ADJ VR located upward on the Power Supply Unit to make it within 0.1V. (2) If the difference between the printed voltage of Va and the indicated value of Va Voltmeter is over 0.2V, adjust the Va ADJ VR located upward on the Power Supply Unit to make it within 0.2V. (3) Check and do the procedure (1) again. <Example of the Voltage Label>
<LOT> ************** Vs= 80.0V Va=60.0V Vw=140.0V Vx=60.0V
Applicable Model
Preparation (1) Keep heat-run for 1 minutes or more.
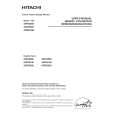
(2) Connect the DC Voltmeter to the Vs test point and the GND point (or the Va test point and the GND point) on the Power Supply Unit. (3) Receive the all black signal with no setup. (4) Check the indication of Vs and Va voltages printed on the label located upper right side on the Panel Module.
Label
Y-sus
Power Supply Unit
X-sus
MPF7409 S/N ********* * MADE IN JAPAN
Panel Module
(Rear View)
Va ADJ Va
Vs ADJ
GND
Power Supply Unit
Vs
25
|