|
|
|
Categories
|
|
Information
|
|
Featured Product
|
|
|
 |
|
|
There are currently no product reviews.
 ;
Quick site processing. A complete and very useful manual with all details. Thank you!
;
Quick service response. A useful and very rare service manual with all details. I recomend this service.
;
I ordered this manual sometime in the afternoon and I received it on my e-mail the same evening.
This is a fantastically good and properly scanned copy of the original manual. All pages are of the same scale and they overlap each other. It means that you can print the manual and easily make it as a convenient paper manual.
The content of the manual is fantastic. Alignment descriptions, PCB layouts and elementary diagrams are explicit and precise. I immediately found what I was looking for. Thanks to this manual and Owner-Manuals.com my amplifier is alive again. Many thanx indded!
;
The manual was well-scanned and easy to read. As an added bonus, the Operator's Manual was bundled with the Service Manual!
I'd definitely use owner-manuals.com again.
;
Finally, i found one website, where i can download this service manual , and fix my hifi. The service manual is very good, and easy to download and to print.
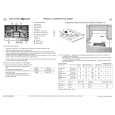
64LHP5000 PROJECTOR UNIT
10 -2
Green line adjustment
1st FAC
� Adjustment in the vertical direction
Start » Vertical correction adjustment of the green line
� Select the Adjustment item
GV - STATIC
� Adjust the Data value
Note : � Repeat the adjustments until you attain the optimum state. � Fine-adjust over the entire picture to obtain the optimum picture. � If the adjustment of V-STATIC is not possible within the range of 010 to �010, set the data value to 0, turn the centering magnet of the deflection yoke and fine-adjust V-STATIC. Screen No. Adjustment Method � Adjust the center horizontal line to the center of the screen.
or
or
In particular, be aware of the setting before adjustment.
Adjustment Items 1 2 3 4 5 6 7 GV-STATIC GV-SKEW GV-BOW (GV-3D SKEW)
" " " " "
� Adjust so that the green vertical line at the center becomes a straight line with neither distortion nor tilting.
(GV-4D BOW)
"
(GV-5D SKEW)
"
Note: Do not adjust items 6 and 7.
(GV-6D BOW)
"
1 2 3
Line-interval Center-line Adjustment
GV-SIZE GV-LIN
" "
� Adjust so that the intervals of the green horizontal lines at the top and bottom of the screen are symmetrical and correct.
GV-MID SIZE
"
4 5 6
GV-MID LIN
"
(GV-5D SIZE) (GV-6D LIN)
"
Note: Do not adjust items 5 and 6.
� Screen
� STATIC
1
Key No.
» Screen�s changes in the vertical direction when manual convergence adjustment is mode The changes at the arrow parts shown below are those implemented using the Volume ± key. Changes are opposite to the arrow when the Volume � key is used.
� SKEW
2
� 3D SKEW
3
� 5D SKEW
4
Key No.
� SIZE
8
� MID SIZE
9
� 5D SIZE
10
Key No.
� BOW
5
� 4D BOW
6
� 6D BOW
7
Key No.
� LIN
11
� MID LIN
12
� 6D LIN
13
Key No.
= Fixed position Fig. 3. Vertical correction (1)
30
|
|
|
> |
|
|
Parse Time: 0.281 - Number of Queries: 138 - Query Time: 0.084