|
|
|
Categories
|
|
Information
|
|
Featured Product
|
|
|
 |
|
|
There are currently no product reviews.
 ;
perfect! you just sent to me the copy in Italian witout even my specification!!!! so you are really smart cooperative and efficient. To my opinion the best place all over to get a manual of electronics!!!!
;
Well Well Well!!!! Good manual perfect for my hobby!!! As Before you have done a very well done work!!!! Thank you
;
Super nice! Good to have a manual in digital format.
;
Great job supplying the manual.
Many of these products weerepretty obscure, so it was great that you had
the manual for it!
;
Great manual, would not have been able to operate my machine without it!!
James Dawson August 18, 2012
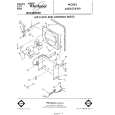
1. To remove
outer cabinet,
o Disconnect power cord. D Take off the plastic grille. Remove the two screws at the bottom. Drop grille down ana take out
TOP FLANGE SCREWS
(side of cabinet)
c. Remove the socket head screws on each side and top flange screws (see illustrations). On 30, 40 and 48 pt. models, also remove rear grille. Pull out at bottom and drop grille down. d Lift cabinet from unit.
2. Coils should be inspected annually. If needed. brush clean with warm water and mild detergent. Rinse and dry. Be sure power supply cord is disconnected.
COILS
3. The compressor
IS sealed
and needs
no oiling
4. The fan motor is prelubricated and does not require further oiling under normal operating conditions. However, if the dehumidifier is operated under severe environmental conditions (dust, dirt, high temperatures) the fan motor should be oiled annually through the provided oil tubes (holes]. An easy to use capsule of especially recommended oil (Part Number 10943) IS available through your nearest Whirlpool Factory Service Center, or use SAE #20 nondetergent oil. 5. Wash plastic parts with a soft cloth, warm water and mild detergent. Rinse and dry with a soft cloth. 6. Replace cabinet supply cord. grille(s). Reconnect power
|
|
|
> |
|
|
Parse Time: 0.163 - Number of Queries: 101 - Query Time: 0.025