|
|
|
Categories
|
|
Information
|
|
Featured Product
|
|
|
 |
|
|
There are currently no product reviews.
 ;
Actually, I was looking for this information for 3 years!...now thanks to you, the manual is on my hands and of great help, cause I understand now where I was doing wrong connections and wires...excellent, I'll be back to you if in need, thank you.
 ;
This manual covers the main equipment features only. While it also includes the procedure for saving and loading from the now long obsolete memory cards it does not mention the how to operate with the optional floppy drive interface so I am still at a loss about how to use this! Note that there is a separate manual covering the MIDI interface and programming via the keyboard, not included in this download. You will also need to get hold of this if you want to use the MIDI interface properly. Basically there is little difference between this manual and the free to download manual for the similar PR60 model.
;
Good list of manuals. I found a very rare one and easily get. Should be promptly to download, as we must to wait hours even after confirmed payment.
;
The manual was properly scanned and perfectly readable. The only small problem is that I couldn't use my dear Ctrl + F to find a word I needed.
;
Nothing wrong with the manual or the delivery - came to me the same day I ordered it. But afterwards I realized that I ordered the wrong manual. Probably better with the Quick start - version. So maybe it would be better if we could see a list with inhold for each manual before ordering?
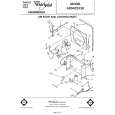
1. To remove
outer cabinet,
o Disconnect power cord. D Take off the plastic grille. Remove the two screws at the bottom. Drop grille down ana take out
TOP FLANGE SCREWS
(side of cabinet)
c. Remove the socket head screws on each side and top flange screws (see illustrations). On 30, 40 and 48 pt. models, also remove rear grille. Pull out at bottom and drop grille down. d Lift cabinet from unit.
2. Coils should be inspected annually. If needed. brush clean with warm water and mild detergent. Rinse and dry. Be sure power supply cord is disconnected.
COILS
3. The compressor
IS sealed
and needs
no oiling
4. The fan motor is prelubricated and does not require further oiling under normal operating conditions. However, if the dehumidifier is operated under severe environmental conditions (dust, dirt, high temperatures) the fan motor should be oiled annually through the provided oil tubes (holes]. An easy to use capsule of especially recommended oil (Part Number 10943) IS available through your nearest Whirlpool Factory Service Center, or use SAE #20 nondetergent oil. 5. Wash plastic parts with a soft cloth, warm water and mild detergent. Rinse and dry with a soft cloth. 6. Replace cabinet supply cord. grille(s). Reconnect power
|
|
|
> |
|
|
Parse Time: 0.232 - Number of Queries: 113 - Query Time: 0.05