|
|
|
Categories
|
|
Information
|
|
Featured Product
|
|
|
 |
|
|
There are currently no product reviews.
 ;
I was at first dubious about payiong for downloaded manuals but having done so, I was extremely impressed with quality of the two manual I ordered, well worth the small price I paid.
I would highly recommend these to my friends.
;
reasonable price for the schematic - the service is perfect, all as expected and pointed by instructions - good scan of the original plans - thank you!
;
Manual was just as described!!! I odered it and in less than a day was able to download it and the text was clear and pages were all complete just as the original manual was. Purcashed this for a friend and they were more than happy. Perfect all around!
 ;
Excellent service and prompt delivery. But it's not a manual - only 4 pages wiring diagrams.
Thanks.
;
The manual I purchased was exactly what I needed to repair my Toshica television. The manual contained schematics and troubleshooting information that was very helpful.
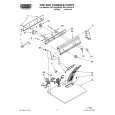
6) Attach the developer tank to the developer cartridge. * After supplying developer into the developer cartridge, do not tilt or shake the developer cartridge. 7) Attach the developer cartridge to the copier, and fix it with the screw.
4. Removal and storage of fixing screw
1) Lift the knob and gently pull out the tray.
B. Toner cartridge installation
1) Shake the toner cartridge several times horizontally, and remove the tape. * Do not hold the shutter lever when shaking. * After removing the tape, do not tilt or shake the toner cartridge.
4 or 5 times
2) Hold the paper pressure plate and turn the fixing screw in the arrow direction.
Shutter Tape
2) Attach the toner cartridge to the copier. 3) Store the fixing pin and the fixing screw in the tray. � Store the fixing screw which was removed in the above procedure 2 and the fixing screw which was removed in procedure 2 of 2.
�
Removal of protective material and fixing screw in the storage place in the tray.
3) Pull the shutter lever.
Pressure plate lock
Screw
Close the front cover A, then close the side cover B. � When closing the front cover, gently press the both sides. � When closing the side cover, hold the knob.
�
When closing the covers, be sure to close the front cover first, then close the side cover. If closed in a wrong sequence, the covers may be broken.
B
A
AR-162 UNPACKING AND INSTALLATION � 2
 $4.99 AR163 SHARP
Owner's Manual Complete owner's manual in digital format. The manual will be available for download as PDF file aft…  $4.99 AR-163 SHARP
Parts Catalog Parts Catalog only. It's available in PDF format. Useful, if Your equipment is broken and You need t…
|
|
|
> |
|