|
|
|
Categories
|
|
Information
|
|
Featured Product
|
|
|
 |
|
|
There are currently no product reviews.
 ;
I will highly recommend this seller. They are honest, accurate, fast and responsible.
;
This manual was very good & was very helpful with repairs.
Always great & fast service from Owner's manual.
;
Very pleased with the quality of the scan. No complaints whatsoever.
 ;
I liked the product. I would use their sevices again.
;
I Recently purchased yet another Service Manual from Owner-Manuals.com, this time for a Sony EVS700ES/UB Videocassette Recorder. The Manual was available for upload within two hours and is an Extremely Good copy, as some of this I was able to enlarge to get even better detail.
Once Again, Very happy with the result!
AV-1434EE AV-1414EE
AV-1414EE/SK
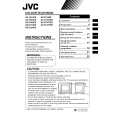
DISASSEMBLY PROCEDURE
REMOVING THE REAR COVER
1. Unplug the power plug. 2. As shown in figure, remove the
5
screws marked
!
and a
screw marked " . 3. Withdraw the rear cover toward you. [CAUTION] " When reinstalling the rear cover, c arefully pus h it inward after inserting the MAIN PWB into the rear cover groove.
REMOVING THE MAIN PW BOARD
" After removing the rear cover. 1. Slightly rais e the both sides of the MAIN PW BOARD by hand and remove the PWB stopper marked # from the front cabinet. 2. Withdraw the MAIN PW BOARD backward. (If necess ary, take off the wire clamp, c onnectors etc.)
REMOVING THE SPEAKER
" After removing the rear cover. 1. By holding up the SPEAKER HOLDER marked $ slightly and unlocking the claw, the SPEAKER HOLDER can be removed. Then you c an remove the SPEAKER.
CHECKING THE MAIN PW BOARD
1. To check the back side of the PW Board. 1) Pull out the MAIN PW Board. (Refer to REMOVING THE MAIN PW Board) 2) Erect the PW Board vertic ally so that you can easily check the back side of the PW Board. [CAUTION] " When erecting the PW Board, be careful s o that there will be no contacting with other PW Board. " Before turning on power, make sure that the CRT earth wire and other connector are properly c onnected.
WIRE CLAMPING AND CABLE TYING
1. Be sure to clamp the wire. 2. Never remove the c able tie used for tying the wires together. Should it be inadvertently removed, be sure to tie the wires with a new cable tie.
10
No. 52015
|
|
|
> |
|