|
|
|
Who's Online
There currently are 5782 guests online. |
|
Categories
|
|
Information
|
|
Featured Product
|
|
|
 |
|
|
There are currently no product reviews.
 ;
great site, the most easy and fastest way to find the manual you need, no 5 star because the manual was only available in german, but I speak german as well so no problem for me.
 ;
thanks for this download i got a pioneer bdp-lx70a blu-ray player and it had no manual i search everywhere on the internet and came across owner-manuals.com and i found that it was so easy to find and downloaded from this site if i ever need a manual again this would be the first place that i would come too thanks guys
;
Superb! It's the original manual. We can now use our old calculator with its full function.
;
This is a very well written and comprehensive manual. It answered all our queries.
;
Excellent copy that was delivered within 12 hours and solved my problem.
TV channel presetting (continued) To edit the channel list (PR LIST) (MOVE and DELETE in the EDIT menu)
You can edit the TV channel list as you like. Note: After this operation, other channel�s PR numbers will be changed. 1 Display the INSTALL menu.
� MENU INSTALL menu
To add in the new channel (INSERT in the EDIT menu)
You can add in the new channel in the TV channel list as you like. You need to find the �CH/CC� number for the TV channel. Find the �CH/CC� number corresponding to the channel number of the TV channel from the attached sheet �CH/CC number list� on page 19. 1 Display the INSTALL menu.
� MENU INSTALL menu
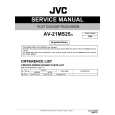
2 Choose EDIT/MANUAL, then press the MENU/OK button.
EDIT menu appears.
EDIT PR AV 1 2 3 4 5 6 CH/CC I I I I CH 04 CH 76 CH 78 CH 05 CH 28 CH 10 MENU : OK MOVE
2 Choose EDIT/MANUAL, then press the MENU/OK button.
EDIT menu appears.
3 Choose the PR number for which you will register a new TV
channel. When you add a new TV channel of NTSC-M system, press the SOUND SYSTEM button to change the sound system to M. Then proceed to the next step. 4 Press the green button, then press 3 buttons to choose �CC� or �CH�. 5 Press the number button to enter the remaining CH/CC number. The TV starts to search the TV channel, and the picture of the TV channel appears. If the TV finds no TV channel, a noisy picture appears. When a TV channel has already been registered in PR99, using the INSERT function deletes that TV channel. � About the basic operations of the menu, please see the �How to operate menus and menus locations� on page 5.
3
IINSERT IDELETE IMANUAL
3 Choose the channel which you want to change PR number, or 4
delete. Do the following action:
To change the PR number (MOVE) To delete the channel (DELETE) Press the 3 button. Then move it to the PR number you want to use it for the channel. Finally press the 2 button. Press the yellow button.
5 Press the MENU/OK button to exit the menu.
18
|
|
|
> |
|