|
|
|
Who's Online
There currently are 5518 guests online. |
|
Categories
|
|
Information
|
|
Featured Product
|
|
|
 |
|
|
There are currently no product reviews.
 ;
I purchased the unit from a private party and the original owners manual was not available. Having the ability to download it was extremely helpful and clarified operating the equipment immensely. This is a complicated unit and without the manual I would not have been able to maximize it's potential. Thank you.
;
Being a user of older radios of many kinds, preferring them over more modern rigs, this manual was invaluable in the programming of my two. I now know for certain what the assorted buttons functions are, and am very grateful to have found this excellent site. Many thanks for your assistance, Tony.
 ;
Clear and easy to read. All details as expected. Price acceptable , and quick delivery.
;
Quick response and exactly what I was looking for and at a great fair price!
;
5 star quality on these downloadable manuals. Easy to read and all the information is there. A must when doing a custom install or needing to service your precious old school electronics.
HUOLTO JA PUHDISTUS
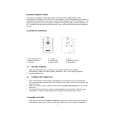
RUMMUN JA ALTAAN V�LIIN PUDONNEEN ESINEEN POISTAMINEN
Jos rummun ja altaan väliin vahingossa putoaa jotain, esine voidaan poistaa irrotettavan muovisen luukun kautta: 1. Irrota pistoke pistorasiasta. 2. Tyhjennä rumpu pyykistä. 3. Sulje rummun luukut ja käännä rumpu ylösalaisin. 4. Paina muovinipukkaa ja siirrä samalla muoviluukkua vasemmalta oikealle. Luukku putoaa rumpuun. 5. Avaa rumpu: voit ottaa vieraan esineen pois rummussa olevan aukon kautta. 6. Laita muoviluukku paikalleen rummun sisäpuolelta: Aseta muovinipukka rummun oikealla puolella olevan aukon päälle. Siirrä sitten muoviluukkua oikealta vasemmalle, kunnes se lukittuu. 7. Kytke laite sähköverkkoon.
56
|
|
|
> |
|