|
|
|
Who's Online
There currently are 6043 guests online. |
|
Categories
|
|
Information
|
|
Featured Product
|
|
|
 |
|
|
There are currently no product reviews.
 ;
Great price for the manual and easy to locate on the site and download. I would buy again.
 ;
Very good copy of Manual, clear and easy to print off, arrived very promptly and reasonably priced. Thanks, I will use you again
;
The service manual when downloaded and printed out was clear and easy to read. The manual is complete with the schematic diagram and technical data. I occasionally require a manual and now having registered with this company I shall order from them in the future.
;
Great manual, great price. I am very pleased with Owner-Manuals.com, quick service, fast communication. Will definitely use this site again.
;
Hello from Germany - thank you very much for the manual for my Sharp "Searcher" - the handling of your internet area is outstanding..Mike
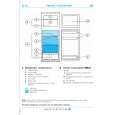
Basics of Using the CD Player � Normal Play
Playing a Disc �����������������������
1. Prepare the discs.
FM/AM TAPE CD AUX
2. Press the CD £/8 or CD1, CD2 or CD3 button of the disc you want to play.
When using the Remote Control, press the £/8 button or the CD1, CD2 or CD3 buttons. The first track of the selected disc will begin playing. The CD Player automatically stops when the playback finishes the last track of the CD. � If these buttons are pressed while the tray is open, the tray is automatically closed and playback starts. To stop playing the disc, press the 7 button (or the 7/CLEAR button on the Remote Control). To stop play and remove the disc, press the 0 button for the disc being played. To pause, press the CD £/8 button (or the 3/8 button on the Remote Control). The display will blink. To cancel pause, press the CD £/8 button again (or press the 3/8 button on the Remote Control). Play continues from the point where it was paused.
or
Selecting a Disc, Track or Passage Within a Track ����
1. Press the CD1, CD2 or CD3 button for the disc tray containing the track you want to listen to.
�
P. DOWN P. UP
Example: for the third disc, press CD3.
2. Press the P. DOWN 4 or ¢ P. UP button to select the track.
The selected track starts playing. Each time you briefly press and release the P. DOWN 4 or ¢ P. UP button, the track changes by one. � Press and release the ¢ P. UP button to go ahead one track at a time. � Press and release the P. DOWN 4 button to go back one track at a time. Holding down the P. DOWN 4 or ¢ P. UP button, during playback, will fast forward/backwards the CD so you can quickly find a particular passage in the selection you are listening to. When using the Remote Control, press the 4 or ¢ button.
or
Locating a Track with the Remote Control Directly ���
Using the number keys on the Remote Control allows you to go directly to the beginning of any track.
CD1 CD2 CD3
1. Press the CD1, CD2 or CD3 button for the disc tray containing the track you want to listen to.
� Example: for the third disc, press CD3.
CLOCK
TIMER
1 4 7 10
2
� SELECT +
3 6
SET
2. Enter the number of the track you want to listen to with the number keys.
The selected track starts playing. � Example: For track 5, press 5. For track 15, press +10 then 5. For track 20, press +10, then 10. For track 32, press +10 three times, then 2.
5 8
9
Changing Discs While Playing ���������������
+10
You can replace a CD in a tray not being used, while another CD is playing.
1. Press the 0 button of the tray not being used.
The tray opens.
2. Replace the disc in the tray. 3. Press the 0 button to close the tray.
14
English
|
|
|
> |
|