This is a good quality scan of the original Service Manual from Nordmende, Germany. Contains the circuit diagram, PCB layout, adjust/tune instructions as well. It is NOT in English but in GERMAN language! That was quite right for my german friend from the lower east side in Berlin.
Received via e-mail this PDF manual is worth the money. This is a quality scan of a manual in excellent condition and is just as good as having the original manual in hand. I have later seen the original manual and it was printed in colour, but this particular manual is black & white but scan resolution is high end quality! All drawings and pictures are presented in great detail. So, nearly perfect score in my opinion.
If you own the turntable you also should own the manual!
Manuals were delivered promptly and were correct as advertised. No issues with the download link which was provided promptly after everything was processed. Very pleasant experience
Text excerpt from page 16 (click to view)
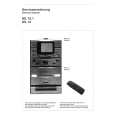
Step2: Charging the battery pack (Continued)
3 Connect the AC Adaptor to the
DC IN jack on the Handycam Station for the DCR-HC35E or on your camcorder for the DCRHC23E/HC24E/HC26E. For DCR-HC35E:
DC IN jack
4 For DCR-HC35E:
Connect the mains lead to the AC Adaptor and the wall socket. Insert the camcorder into the Handycam Station securely, all the way to the bottom.
With the v mark facing up
For DCR-HC23E/HC24E/HC26E:
CHG (charge) lamp
The CHG (charge) lamp lights up and charging starts.
� When inserting the camcorder into the Handycam Station, close the DC IN jack cover.
DC IN jack With the v mark facing to the LCD screen
For DCR-HC23E/HC24E/HC26E: Connect the mains lead to the AC Adaptor and the wall socket.
CHG (charge) lamp
The CHG (charge) lamp lights up and charging starts.