|
|
|
Categories
|
|
Information
|
|
Featured Product
|
|
|
 |
|
|
There are currently no product reviews.
 ;
perfect copy, im very satisfied, i was need the diagram over the powersupply and
the copy was very sharp
;
This is exactly the service manual I needed.
Complete with all schematics, partslists, PCB layouts and alignment instructions.
This manual covers both the T-4970 en T-488F Onkyo tuner.
 ;
IF PRINTED CIRQUIT BOARD WIRING VIEW WAS ONE TONE LIGHTER, THEN 5 STAR RANK HAS TO BE MY CHOISE.
;
Very usefull, good quality drawings !
Muito útil encontrei todas as informações necessárias.
;
Wanting to repair a neighbours tape recorder I needed the necessary information, it makes it easier. Although the service manual is described as "Language : English" To my dismay I found that it is entirely written in German, a language I do not understand. At least I now have the schematics which will help of sorts. I may not use this service again due to the laguage difficulty after all when it states English you do not expect it to be entirely in another language.
5.4
Updating the firmware of the drive unit
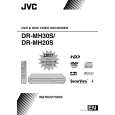
� Firmware update disc supports only DVD-RAM media. � When firmware update is necessary, written discs are distributed by DIGITAL VIDEO STORAGE CATEGORY, CS group. (1) Turn the main body ON. (2) Load the update DVD-RAM disc on the tray and close the tray. (3) �READING� is displayed in the FL indicator and the update is started. (4) In a short while �READING� in the FL indicator disappears, open the tray to remove the disc and close the tray. (5) Turn the power OFF and pull out the power code from the wall socket, then plug the power cord into the wall socket again. (6) Set to the JIG mode and check the firmware version of the drive. 5.5 Taking out a disc <Method 1 > There is a forced tray eject mode with electrical operation. (1) Right after plugging in the power code (while �LOADING� is displayed), keep pressing the OPEN/CLOSE button of the main body. (2) Remove the disc as the tray is ejected in a short while. (3) Make sure to close the tray afterwards. <Method 2 > When the disc cannot be removed by operating above <Method 1 >, open the front door of the main body manually and directly press the EJECT button located in the lower right of the drive unit. <Method 3 > When neither <Method 1> nor <Method 2> can remove the disc, the tray can be ejected mechanically without turning the power on. (1) Open the front door of the main body manually. (2) Insert a fine wire (e.g. a straightened paper clip) into the hole in the lower part of the tray of the drive unit. (3) As the tray ejects a little, pull out the tray manually.
Front door
Tray
Hole EJECT Button
5.6 Exchanging the fitting As the fitting that comes with the service drive unit cannot be used, make sure to attach a service fitting when the drive unit is exchanged. The fitting that is removed from the old drive unit can be attached to the new drive unit. The fitting can be removed by pulling upwards while opening out the lower part of the fitting outwards.
Tray
Fitting
1-16 (No.YD027)
|
|
|
> |
|