|
|
|
Categories
|
|
Information
|
|
Featured Product
|
|
|
 |
|
|
There are currently no product reviews.
 ;
Thank´s for your help, I already recived these manual from you
;
Thank you for your manual It has the basic things to and i use the Oszi for Longer Time.
THX
;
Actually, I was looking for this information for 3 years!...now thanks to you, the manual is on my hands and of great help, cause I understand now where I was doing wrong connections and wires...excellent, I'll be back to you if in need, thank you.
 ;
This manual covers the main equipment features only. While it also includes the procedure for saving and loading from the now long obsolete memory cards it does not mention the how to operate with the optional floppy drive interface so I am still at a loss about how to use this! Note that there is a separate manual covering the MIDI interface and programming via the keyboard, not included in this download. You will also need to get hold of this if you want to use the MIDI interface properly. Basically there is little difference between this manual and the free to download manual for the similar PR60 model.
;
Good list of manuals. I found a very rare one and easily get. Should be promptly to download, as we must to wait hours even after confirmed payment.
Adjusting the picture quality settings
To create your own setting (1)
6
Repeat steps 4 and 5 to make adjustments to other settings.
If you would like to save the settings in the player�s memory, be sure to select either [1], [2], or [3] in the [Memory] setting to establish which memory location to save the new settings in. Please note that if you select a location where settings have already been saved, the old settings will be replaced by the new ones.
1
Use the cursor button (3) to select [Start] then press ENTER.
Video Memory Select Video Setup
2
Use the cursor button (�) to select [Video Setup] then press ENTER.
Memory Move
ENTER
Off Select
1
2
3 Check
DISPLAY
7
Video Memory Select Video Setup
When you are finished making adjustments, press ENTER to establish the new settings.
3
Use the cursor buttons (2/3) to select the setting to [On] or [Off].
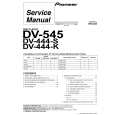
To create your own setting (2)
1
Use the cursor button (3) to select [Start] then press ENTER.
Fine Focus Move
ENTER
On Select
DISPLAY
Off Check
Video Memory Select Video Setup
4
Use the cursor buttons (5/�) to select the setting to adjust.
You can adjust any or all of the following picture quality factors: Fine Focus Switch on to reveal greater detail (higher resolution) in the picture. Contrast Adjusts the contrast of the elements in the picture. Sharpness Adjusts the sharpness of the mid-frequency (less detailed) elements in the picture. (This setting is only effective when [Fine Focus] is [On].) Chroma Level Adjusts how saturated colours appear. Hue Adjusts the overall colour balance between red and green. (This is only effective when the player is connected using the VIDEO OUT or S-VIDEO OUT jacks.)
2 3
Use the cursor button (�) to select [Video Setup] and press ENTER. Press DISPLAY.
Fine Focus Contrast Sharpness Chroma Level Hue Memory
min soft min green Off
On
Off
max fine max red
1
23
4
Use the cursor buttons (5/�) to select the setting and use the cursor buttons (2/3) to adjust the settings.
Adjust these while a disc is playing to see the effect of changes immediately.
5
Use the cursor buttons (2/3) to adjust the settings.
Adjust these while a disc is playing to see the effect of changes immediately.
5
To memorize the setting, select [Memory1, 2, 3], then press ENTER.
The previous setting will be erased.
30
En
|
|
|
> |
|