|
|
|
Categories
|
|
Information
|
|
Featured Product
|
|
|
 |
|
|
There are currently no product reviews.
 ;
very fast detailed and accurate hope to do business again
;
This was precisely what I was looking for. Complete and good quality!
 ;
This is the ONLY copy of this manual I could find for a realistic price. Even Panasonic could not provide me with one.
The PDF is a very good copy and it helped me diagnose and find the fault with the unit I have.
;
Very complete and well reading drawings. Documentation is essential for successful repairs.Good documentation, with all that is necessary. This manual was what I was waiting with all the information necessary for the repairing I need it for. You must buy it if you want to do repairs or simply understand how it works.
;
Excellent service manual includes everything is need to repair this radio-caseete, how to disassemble, wiring diagram, all , waiting time until the download was only a few hours. I'm going to buy service manuals from here, are cheap and very good.Thank you.
5
6
7
8
6. ADJUSTMENT
[Purpose]
If the combination of MAIN Assy and LOADER Assy is changed, the adjusted value for LD power will be shifted, and stable playback or recording of a disc will become impossible. Therefore, when the combination of MAIN Assy and LOADER Assy is changed, LD power adjustment and adjustment for disc judgment will be necessary. Be sure to do this adjustment at following cases. � When replacing MAIN Assy � When replacing LOADER Assy
[Tools to be used]
� Special tool for adjusting the LD power (GGF1559) � 10-pin FFC flexible cable (GGD1477) � CD-ROM test disc: CDT-313 (GGV1054) � DVD dual-layer test disc: DVDT-002 (GGV1036)
A
[Notes]
Never turn the power off while any of the following operations is in progress: � While laser diode (LD) power adjustment is being performed normally by the unit � While adjustment for disc judgment is being performed
B
[Connections]
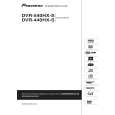
� Connections for adjusting the LD power
Special tool for adjusting the LD power
POWER SUPPLY Unit HDD
C
Main Assy and writer
Note: Before adjusting the LD power, disconnect the power to the HDD and the flexible cable for ATA (40-pin). � To which the special tool for adjusting the LD power is connected
The right side (see the figure below) of the connector is for connection of the flexible cable.
GGD1477 GGF1559
CN5601
D
Main Assy
CN1402 CN1401
Special tool for adjusting the LD power
Connect the 10-pin flexible cable to the lower part of CN401.
� Setting of the switches on the special tool for adjusting the LD power
E
GGF1559 Set all five switches to ON.
F
DVR-540HX-S
5 6 7 8
87
|
|
|
> |
|
|
Parse Time: 0.204 - Number of Queries: 101 - Query Time: 0.039