|
|
|
Who's Online
There currently are 6043 guests online. |
|
Categories
|
|
Information
|
|
Featured Product
|
|
|
 |
|
|
There are currently no product reviews.
 ;
The manual was made available promptly. I is a clean scan of the original. I had no problem downloading it. The scan was well centered and cleanly formatted. It is as good a product as can be had without being the original document.
 ;
Received downlink in less then 8 hours, Item was in good copy condition, and told me how to program the clock timer. The price was very resonable, and the process was very automated and was GREAT to work with.
;
Fast service, document is OK. Thanks! Searched for it long time.
;
I was very pleased with the manual I got for my amateur (ham) radio. Without it I could not figure out how to input and/or change the P/L setting on my radio. It drove me nuts as the radio was essentially useless. That all changed when my manual came. Then it took only minutes and I was done. Now my radio works fine. This is an exceptionally good resource as it's a very easy and user friendly download. Thank you very much! Dziękujemy za!
;
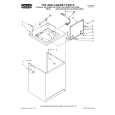
It answered my question, which was how to load the paper. I did notice that the very end of the manual was not visible.
Section
04
Initial Settings
Note You can match the clock to a time signal by pressing MULTI-CONTROL. ! If 00 to 29, the minutes are rounded down. (e.g., 10:18 becomes 10:00.) ! If 30 to 59, the minutes are rounded up. (e.g., 10:36 becomes 11:00.)
1 Display the initial setting menu. Refer to Adjusting initial settings on the previous page. 2 Use MULTI-CONTROL to select AM STEP. 3 Press MULTI-CONTROL to select the AM tuning step. Pressing MULTI-CONTROL repeatedly will switch the AM tuning step between 9 kHz and 10 kHz. The selected AM tuning step will appear in the display.
Setting the FM tuning step
The FM tuning step employed by seek tuning can be switched between 100 kHz, the preset step, and 50 kHz. ! If seek tuning is performed in 50 kHz steps, stations may be tuned in imprecisely. Tune in the stations with manual tuning or use seek tuning again. 1 Display the initial setting menu. Refer to Adjusting initial settings on the previous page. 2 Use MULTI-CONTROL to select FM STEP.
Switching the auxiliary setting
Auxiliary devices connected to this unit can be activated individually. Set each AUX source to ON when using. For more information about connecting or using auxiliary devices, refer to Using the AUX source on page 32. 1 Display the initial setting menu. Refer to Adjusting initial settings on the previous page. 2 Use MULTI-CONTROL to select AUX1/ AUX2. 3 Press MULTI-CONTROL to turn AUX1/ AUX2 on.
# To turn AUX off, press MULTI-CONTROL again.
3 Press MULTI-CONTROL to select the FM tuning step. Pressing MULTI-CONTROL repeatedly will switch the FM tuning step between 50 kHz and 100 kHz. The selected FM tuning step will appear in the display.
Note The tuning step remains at 50 kHz during manual tuning.
Switching the dimmer setting
To prevent the display from being too bright at night, the display is automatically dimmed when the car�s headlights are turned on. You can turn the dimmer on or off. 1 Display the initial setting menu. Refer to Adjusting initial settings on the previous page. 2 Use MULTI-CONTROL to select DIMMER.
Setting the AM tuning step
The AM tuning step can be switched between 9 kHz, the preset step, and 10 kHz. When using the tuner in North, Central or South America, reset the tuning step from 9 kHz (531 kHz to 1 602 kHz allowable) to 10 kHz (530 kHz to 1 640 kHz allowable).
28
En
|
|
|
> |
|