Having bought a pre-owned Sony FM stereo tuner through eBay, it came without any manuals. It soon became clear that to get the best from this excellent tuner I needed a decent manual because much of the operation was not intuitive to a newboy to hi fi like me. I managed to download the official Sony multi-lingual manual from Owner-Manuals.com with no problem at all - a really quick and easy service. I'm very glad I did because I found out all the operations of the tuner and was then able to not only set it up quickly but also to get much more from it that poke-and-hope trialling would ever achieve. In my book $4.99 very well spent.
This manual is immaculate in it's accuracy. Everything is written very clearly and easy to understand. Written by a professional who wants to convey a clear and easy to understand message!!
Great site, I always find all the manuals I need and i can't find anywhere else. PDF for the Sony PCM 3348 is complete and scan is good quality. Thank you!
Text excerpt from page 33 (click to view)
EN33
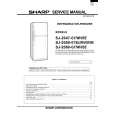
1 2 3 4 5
Make sure all units are turned off. Connect the camcorder to a TV or VCR as shown in the illustration ( pg. 32). If using a VCR . . . go to step 3. If not . . . go to step 4. Connect the VCR output to the TV input, referring to your VCR�s instruction manual. Turn on the camcorder, the VCR and the TV. Set the VCR to its AUX input mode, and set the TV to its VIDEO mode.
NOTES: � It is recommended to use the AC Power Adapter/ Charger as the power supply instead of the battery
pack ( pg. 7). � To monitor the picture and sound from the camcorder without inserting a tape, set the camcorder�s Power Switch to � � or � �, then set your TV to the appropriate input mode. � Make sure you adjust the TV sound volume to its minimum level to avoid a sudden burst of sound when the camcorder is turned on. � If you have a TV or speakers that are not specially shielded, do not place the speakers adjacent to the TV as interference will occur in the camcorder playback picture.
To choose whether or not the following displays appear on the connected TV . . . �Date/Time .... set �DISPLAY� to �ON� or �OFF� in the Playback Menu ( pg. 30). �Time Code .... set �TIME CODE� to �ON� or �OFF� in the Playback Menu ( pg. 30). �Playback Sound Mode Display .... set the Power Switch to � �. Press MENU/ BRIGHT and set �ON SCREEN� in the Date/ Time Menu ( pg. 18 � 20) to �ON� or �OFF�. Then, set the Power Switch back to � �.