|
|
|
Who's Online
There currently are 6043 guests online. |
|
Categories
|
|
Information
|
|
Featured Product
|
|
|
 |
|
|
There are currently no product reviews.
 ;
This GRUNDIG UV5A Owner Manual is not only an instruction manual but a total functional circuit description of the Multimeter and includes circuit diagram at the end pages. It is very helpful for repairing and calibrating the instrument. It is written in two languages English and German for international support. It was very easy to repair my unit with this document. Regards, Regis Pauly, Electrical Engineer.
;
The owner's manual was evetything I thought it would be. I was able to print it out using both sides of the paper in quick order, saving me a search online for a used one.
 ;
Хорошее качество сканирования.
Мануал пришел часов эдак через 12. В целом доволен.
;
Fantastic quality and impressive delivery time. Based on this manual, I recommend this service without hesitation! Five Stars for certain.
;
Was happy to find the complete owners manual... It's all in there, just like the original...
PLAYBACK FEATURES for HDD deck
EN
27
Live Memory Playback
Setting Time for Live Memory Playback
Equipped with a hard disk drive, this recorder allows information to be written to and read from the hard disk at high speeds. Taking advantage of this feature, you can temporarily record programs received with the tuner or from an externallyconnected equipment � CATV or DBS, and can watch them only a few seconds behind actual air time. In this recorder, viewing a program through HDD (not a recorded program) means you are always watching the program temporarily recorded on it. This feature enables you to reverse the program back to view any previous part of it � so called �Live Memory Playback�, which was impossible until now. To access �Live Memory Playback�, all that you have to do is to turn on the recorder and select the HDD deck. So, the temporary recording is started on the HDD deck. And, you can select the length of the time for temporary recording from off, 30 minutes, 1 hour, and 3 hours.
ACCESS MAIN MENU SCREEN
1 2
Press MENU. � If you want to stop the following procedure on its way, press MENU.
ACCESS HDD SET UP SCREEN
1) Press @# (or 23) to move the arrow to �HDD/VHS SET UP�, then press � (or �) or OK. 2) Press @# (or 23) to move the arrow to �HDD SET UP�, then press � (or �) or OK.
HDD/VHS SET UP FUNCTION SET UP
HDD SET UP
VHS SET UP 1
INITIAL SET UP
VHS SET UP 2
LIVE MEMORY
1 HR.
INDEX
MENU
SELECT OK END
SELECT WITH [�523] THEN PRESS [OK]
About �Live Memory Playback�
With a certain amount of space (for 30 minutes, 1 hour, and 3 hours) reserved on the hard disk, the recorder records broadcasts being received or signals input from an externally connected equipment. Even while you are reversing the program to review any previous part, the recorder continues recording the same program or externally-input signals. When the reserved amount of time (or space) runs out, the recorder overwrites the previous recordings on the hard disk, starting with the oldest one, repeatedly if necessary. After having recorded a certain number of programs, if you try to increase the amount of your reserved time on HDD, you may not be allowed to do so because of possible lack of available space, and the recorder will inform you of this by displaying a message on the screen.
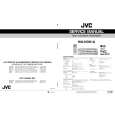
SELECT LIVE MEMORY MODE
3
1) At the �LIVE HDD/VHS SET UP FUNCTION SET UP INITIAL SET UP MEMORY�, press OK. HDD SET UP VHS SET UP 1 VHS SET UP 2 2) Press %� (or 5�) to LIVE MEMORY 1 HR. OFF select the desired 30 MIN. 1 HR. mode, then press OK. 3 HR. a� Select �OFF� if you do not want to use SELECT WITH [�523] the Live Memory SELECT OK END THEN PRESS [OK] Playback. b� Select �30 MIN.� if you want to use the Live Memory Playback for up to 30 minutes.
INDEX MENU
About limitation on Live Memory Playback
Recording to perform Live Memory playback, which means the use of temporary recording on the hard disk, works for signals from built-in tuners, external tuners and externallyconnected equipment. This feature also works for copyprotected programs. The temporary recording for Live Memory is canceled in the following cases, and will start all over again when it is to resume. � When channels are changed � When the power is turned off � When the thumbnails are changed � When the setting for Live Memory playback is changed � When recording is started via the HDD deck or the VHS deck � When a recorded program is played back or deleted
c� Select �1 HR.� if you want to use the Live Memory Playback for up to an hour. d� Select �3 HR.� if you want to use the Live Memory Playback for up to 3 hours.
RETURN TO NORMAL SCREEN
4
Press MENU.
Start Live Memory Playback
You can start Live Memory Playback by pressing @ (or 2) or 1, then press PLAY. When you press @ (or 2) to start Live Memory Playback, the recorder will rewind the pictures to the point where Live Memory time counter shows �00� or �30� in its minutes� place (or to the beginning of the program), then start Live Memory Playback automatically. You can use various playback features during Live Memory Playback. (See pages 30 and 31.) � To stop Live Memory Playback, press STOP. The on-air screen resumes.
 $4.99 HMHDS1U JVC
Service Manual Complete service manual in digital format (PDF File). Service manuals usually contains circuit diagr…
|
|
|
> |
|


