|
|
|
Categories
|
|
Information
|
|
Featured Product
|
|
|
 |
|
|
There are currently no product reviews.
 ;
Very good conversation, Pretty fast Service, wood do it again,
Have paid by Paypal, so i got the Service Manual online after 15 Min.
Very helpfully.
Greeting from Germany,
Hans
;
Good-quality scans. Detailed description. I hope I can repair the machine.
;
High-quality scanning. Detailed description. Recommend for all technician. A+++
;
This is a good quality scan of the original Service Manual from Nordmende, Germany. Contains the circuit diagram, PCB layout, adjust/tune instructions as well. It is NOT in English but in GERMAN language! That was quite right for my german friend from the lower east side in Berlin.
 ;
Received via e-mail this PDF manual is worth the money. This is a quality scan of a manual in excellent condition and is just as good as having the original manual in hand. I have later seen the original manual and it was printed in colour, but this particular manual is black & white but scan resolution is high end quality! All drawings and pictures are presented in great detail. So, nearly perfect score in my opinion.
If you own the turntable you also should own the manual!
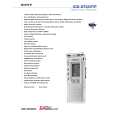
ICD-ST25VTP SECTION 1 GENERAL
Index to Parts and Controls
Refer to the pages indicated in parentheses for details.
This section is extracted from instruction manual.
Front
Rear
qj qk
ql
wa
1 Built-in microphone (12, 14) 2 Built-in microphone (12, 14) 3 OPR (operation) indicator (12, 20) 4 DIRECTNL (directional) switch (14) 5 ERASE button (37) 6 A-B (repeat)/PRIORITY button (34, 44) 7 DIVIDE/ (bookmark) button (33, 40) 8 Display window (24) 9 DPC ON/OFF switch (31)
0 Speaker K zREC (record) /REC PAUSE button (12, 35) L xSTOP button (13, 21) M Jog lever FOLDER/MENU/ .(review/fast backward)/ > (cue/fast forward)/ x� B (play/stop�enter) N VOICE UP (Digital Voice Up) switch (30) O VOL (volume) +/� buttons (20)
w;
qh qj qk ql w; USB connector (56) m (microphone) jack (17) i (headphones) jack (18, 20) HOLD switch (29, 51) DC IN 3V jack (6) (For Korean and the People�s Republic of China Models, this jack does not exist.) wa Battery compartment (6)
Step 2: Setting the Clock
You need to set the clock to use the alarm function or record the date and time. Clock setting display appears when you insert batteries for the first time, or when you insert batteries after the unit has been without batteries for a certain period of time. In this case, proceed from step 4.
Jog lever Press up (>). Turn toward MENU.
2 Press the jog lever (x�B). The month digits will flash. 3 Set the month and day in sequence, then press the jog lever (x�B). The hour digits will flash.
v
5
Set the time.
1 Press the jog lever up or down (>/.) to select the digits of the hour. 2 Press the jog lever (x�B). The minute digits will flash. 3 Set the minute. 4 Press the jog lever (x�B). The menu mode will be displayed again. Note
If you do not press the jog lever (x�B) for more than one minute, the clock setting mode is cancelled and the window will return to normal display.
Press the center (x�B). Press down (.).
1
Turn the jog lever toward MENU.
The menu mode will be displayed in the display window.
2
Press the jog lever up or down (>/.) to select �SET DATE�.
6
Turn the jog lever toward MENU.
The window will return to normal display.
3 4
Press the jog lever (x�B).
The date and time setting window is displayed. The year digits will flash.
1 If the unit is left unused for more than 3 seconds in the stop mode after the clock is set, the display will show the current time (page 27).
Set the date.
1 Press the jog lever up or down (>/. to select the digits of ) the year.
3
|
|
|
> |
|