|
|
|
Categories
|
|
Information
|
|
Featured Product
|
|
|
 |
|
|
There are currently no product reviews.
 ;
I was so happy that the owner's manual was available. It is well written and helped me to use the radio/CD player/recorder without problems. Thanks for making it available.
Irene Lambert
;
Excellant!!! Very quick and easy....Best $4.99 I have spent in a very long time..
I highly recommend this.
;
Thanks so much for the Owner's manual for my Sony PS - FL1. I had purchased the turntable off of eBay. It came in and looked great. Packed well and appeared to be great. I balanced and aligned the tone are and hooked it up. When trying to play a record the tone are would move to the right place and just before it would drop to play it moved back off the edge of the record before touching down. I searched the net for an answer to this issue. No luck. Then I purchased the owners manual and sure enough there was a place to adjust where the stylus touched down. That adjustment solved the problem and saved me a $35 feet to have the player checked out. The manual is well written and easy to understand. It is a must have for anyone with this front loading Sony turntable.
;
Some years back I pruchased a Sansui G-9000. I had it cleaned up and a problem with the left channel repaired. When I got it back I hooked it up to my tape decks, turn tables, TV and it played great. The only thing I was not really satisfied with was the performance of my Graphic Equalizer. I purchased this owner's manual had poured myself a cup of coffee. The manual is well organized and written in plain language. It also contained the solution to my dissatisfaction. By using the preamp connections coupled I was able to run everything through my graphic equalizer and now enjoy the full potential of my complete system.
 ;
An excellent service for the price, however, it would also have been handy if the troubleshooter pages were included. The manual is only sent in the language of your country, thus it looks as though there are some pages missing. Otherwise highly recommended.
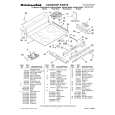
COOKTOP CONTROLS
Do not use steel wool, abrasive cleansers or oven cleaner. Do not soak knobs. When replacing knobs, make sure knobs are in the Off position. On some models, do not remove seals under knobs. Cleaning Method: s Soap and water or dishwasher: Pull knobs straight away from control panel to remove.
s
BROILER PAN AND GRID
Do not clean in the Self-Cleaning cycle. Cleaning Method: s Mildly abrasive cleanser: Scrub with wet scouring pad.
s
Solution of ¹ � cup (125 mL) ammonia to 1 gal. (3.75 L) water: Soak for 20 minutes, then scrub with scouring or steel-wool pad. Oven cleaner: Follow product label instructions.
CONTROL PANEL
Do not use abrasive cleaners, steel-wool pads, gritty washcloths or some paper towels. Damage may occur. Cleaning Method: s Glass cleaner and soft cloth or sponge: Apply glass cleaner to soft cloth or sponge, not directly on panel.
Porcelain enamel only, not chrome Dishwasher s
STORAGE DRAWER (on some models)
Make sure drawer is cool and empty before cleaning. For more information, see �Storage Drawer� section. Cleaning Method: s Mild detergent
OVEN DOOR EXTERIOR
Cleaning Method: s Glass cleaner and a soft cloth or sponge: Apply glass cleaner to soft cloth or sponge, not directly on panel.
WARMING DRAWER (on some models)
Make sure drawer is cool. Cleaning Method: s KitchenAid® Stainless Steel Cleaner & Polish (sample included): See �Assistance or Service� section to order.
s
OVEN CAVITY
Do not use oven cleaners. Food spills should be cleaned when oven cools. At high temperatures, foods react with porcelain and staining, etching, pitting or faint white spots can result. Cleaning Method: s Self-Cleaning cycle: See �Self-Cleaning Cycle� first.
All-Purpose Appliance Cleaner (not included): See �Assistance or Service� section to order. Mild detergent
s
Oven Light(s)
The oven light is a standard 15-watt appliance bulb. It will come on when the oven door is opened. The light will not work during the Self-Cleaning cycle (on some models). On some models, when the oven door is closed, press OVEN LIGHT to turn the light on or off.
OVEN AND ROASTING RACKS
Cleaning Method: s Self-Cleaning cycle: See �Self-Cleaning Cycle� first. Remove racks or they will discolor and become harder to slide. If this happens, a light coating of vegetable oil applied to the rack guides will help them slide.
s
To Replace:
Before replacing, make sure the oven and cooktop are cool and the control knobs are off. 1. Unplug range or disconnect power. 2. Turn the glass bulb cover in the back of the oven counterclockwise to remove.
Steel-wool pad
3. Turn bulb counterclockwise to remove from socket. 4. Replace bulb and bulb cover by turning clockwise. 5. Plug in range or reconnect power.
28
|
|
|
> |
|