|
There are currently no product reviews.
 ;
Thank you for your manual It has the basic things to and i use the Oszi for Longer Time.
THX
;
Actually, I was looking for this information for 3 years!...now thanks to you, the manual is on my hands and of great help, cause I understand now where I was doing wrong connections and wires...excellent, I'll be back to you if in need, thank you.
 ;
This manual covers the main equipment features only. While it also includes the procedure for saving and loading from the now long obsolete memory cards it does not mention the how to operate with the optional floppy drive interface so I am still at a loss about how to use this! Note that there is a separate manual covering the MIDI interface and programming via the keyboard, not included in this download. You will also need to get hold of this if you want to use the MIDI interface properly. Basically there is little difference between this manual and the free to download manual for the similar PR60 model.
;
Good list of manuals. I found a very rare one and easily get. Should be promptly to download, as we must to wait hours even after confirmed payment.
;
The manual was properly scanned and perfectly readable. The only small problem is that I couldn't use my dear Ctrl + F to find a word I needed.
Verhinderung eines möglichen Umfallens der Einheit
� Verwenden Sie bei der Installation des Tischständers besonderes Augenmerk darauf, zu verhindern, dass die Einheit umfallen kann. � Sichern Sie den Pioneer-Bildschirm oder -Fernseher sowohl am Gestell als auch an der Wand.
Stabilisierung auf dem Tisch
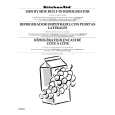
Verwenden Sie zur Fixierung des Pioneer-Bildschirms und -Fernsehers (handelsübliche) Schrauben, wie sie in der Abbildung dargestellt sind.
Verwendung einer Wand zur Stabilisierung
1
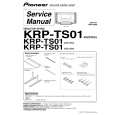
Anbringen von Bolzenschrauben (�senschrauben) zur Verhinderung des Umfallens des Pioneer-Bildschirms oder -Fernsehers. Verwendung von rei�festen Schnuren zur ausreichenden und sicheren Stabilisierung an einer Wand, einem Pfeiler oder einem anderen stabilen Bauelement.
Führen Sie diese Arbeiten in der gleichen Weise auf der linken und der rechten Seite aus.
Verwenden Sie zur Stabilisierung der Einheit auf einem Tisch nur Schrauben, die einen Nenndurchmesser von � mm haben und die mindestens �0 mm lang sind.
2
Verwenden Sie handelsübliche �senschrauben, Schnuren und Halteschrauben. Empfohlene Halteschrauben: Nenndurchmesser M� Länge 1� mm bis 1� mm
Technische Daten
Au�enabmessungen: KRP-TS01 ............. 922 mm (Breite) � 222,4 mm (Höhe) � 430 mm (Tiefe) PDK-TS35A .......... 922 mm (Breite) � 298,9 mm (Höhe) � 430 mm (Tiefe) Gewicht: KRP-TS01 ............. 5,8 kg PDK-TS35A .......... 6,0 kg � Die obigen technischen Daten und das �u�ere können, um das Produkt zu verbessern, ohne vorherige Ankündigung verändert werden.
�1
Ge
Deutsch
|