|
|
|
Categories
|
|
Information
|
|
Featured Product
|
|
|
 |
|
|
There are currently no product reviews.
 ;
A comprehensive Operating and Service Manual. All schematics are complete and easy to read. The PCB drawings and complete parts list are very helpful. I would definitely recommend this manual.
;
SCANNING OF HIGH QUALITY
VERY, VERY HIGH VELOCITY DOWNLOAD
VERY GOOD PRICE,
TRUE SATISFIED, THANKS
;
Genuine Toshiba owner's manual. Couldn't really ask for more. And written in understandable English in contrast to a few recent experiences I have had with manuals for other equipment other than Toshiba but made in China and written in "Chinglish"!
;
I purchased a vintage Sony mixer off eBay and within the hour was able to locate and purchase the manual for it.I mean really,where else can you find a manual for a product made in 1983!? It was easy to find and purchase/download the manual I needed.I will use this site again for other equipment I have! Great site!
;
manual de usuario perfecto y completo de buena calidad de impresion y muy detallado ideal !
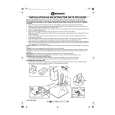
1
Open
2
Close
3 Video Mains Connector 1. Neutral 2. Live 3. NC 4. Earth
4
1 4 3 2
Version Outdoor Camera Standard Standard Standard Standard Monochrome Monochrome Colour Colour INTRODUCTION LDH LDH LDH LDH 1350/10 1370/10 1360/10 1380/10
PAL/CCIR Based on Camera Type LDH LDH LDH LDH 0350/00 0370/00 0360/00 0380/00
NTSC/EIA Outdoor Based on Camera Camera Type LDH LDH LDH LDH 1350/60 1370/60 1360/60 1380/60 LDH LDH LDH LDH 0350/60 0370/60 0360/60 0380/60
GB
F
INTRODUCTION
La caméra pour extérieur LDH 13x0/x0 est disponible en quatre versions, comme le montre le tableau. Elles permettent une installation en toute simplicité dans la mesure où elles sont déjà assemblées, avec un objectif Varifocal. * Le champ de vision final est sélectionné sur site.
The LDH 13x0/x0 Outdoor Camera is available in 4 versions as detailed in the table. They allow easy installation as they are already assembled including a Varifocal lens*. Final field of view is selected on site.
INSTALLATION
Refer to figures 1 through to 5. 1. Use wall bracket supplied (4). 2. Mount the bracket using the template (5), (see back page). Mount the Outdoor Camera onto bracket. 3. Remove the housing cover screw (1-A) and remove cover. 4. Connect power supply and video signal. Refer to Fig. 3 for details. Adjust the lens (2-1 & 2-2) for optimum picture display. Refer to the lens installation instructions for details. 5. Fit the housing cover and secure using screw (1-A). 6. Apply power and check for correct operation. CAUTION: *The black lens hood on the housing is designed to be removed if wide angle lenses are used. If with the required field of view, the lens hood can be seen in the picture area remove it by loosening the 4 retaining screws.
INSTALLATION
Se reporter aux figures 1 à 5. 1. Utiliser le support fourni (4). 2. Monter le support à l�aide du gabarit (5), (voir au verso). Monter la caméra pour extérieur sur le support. 3. Retirer la vis du capot du coffrage (1-A) et retirer le capot. 4. Brancher l�alimentation et le signal vidéo. Se reporter aux Fig. 1 pour plus de détails. Régler de l�objectif (2-1 & 2-2) pour obtenir une image optimale. Se reporter aux instructions d�installation de l�objectif pour plus de détails. 5. Poser le capot du coffrage et fixer à l�aide de la vis (1-A). 6. Mettre sous tension et vérifier le bon fonctionnement. ATTENTION: *Le capuchon noir posé sur l�objectif sur le coffrage est conçu pour être retiré en présence d�objectifs grand angle. Si le capuchon de l�objectif apparaît toujours dans la zone d�image, compte tenu du champ de vision nécessaire, il convient de le retirer et donc de desserrer les 4 vis de retenue.
2
|
|
|
> |
|