I AM HIGHLY IMPRESSED BY THE EASE OF USE OF THIS DOWNLOAD SERVICE. INSTRUCTIONS ARE CLEAR AND SIMPLE TO FOLLOW....EVEN BY TECHNOPHOBES SUCH AS MYSELF. THE EMAILS POINT YOU IN THE RIGHT DIRECTION...ITS SO EASY PEASY. THE DOWNLOAD CHOICE OF USER MANUALS IS EXTENSIVE AND I COULD NOT FIND A CHEAPER OR MORE EFFICIENT SERVICE ON THE INTERNET. I COULD NOT HAVE MADE A BETTER CHOICE OF INFORMATION PROVIDER. SHOULD I EVER NEED ANOTHER USER MANUAL, THEN THIS IS THE FIRST CHOICE SITE. COULD NOT BE BETTER PLEASED!!!!!!!...MANY THANXES FROM JIM BURNS
I was impressed with the quality of service (frequent e-mails to let you know the status of your order), and the speed at which the download became available. The manual was a life saver and was not easy to track down. Thank you for such an excellent service.
the manual was just what i wanted it had all the revelent information required to operate the hifi .Iwould use any manual i downloaded for any item which needs a manual
GOOD SERVICE MANUAL GOT ALL THE INFO. THAT I NEEDED..
Text excerpt from page 6 (click to view)
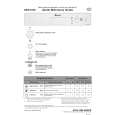
MX-J100 Removing the CD Tray fitting (See Fig. 4 to 6)
Prior to performing the following procedure, remove the top cover and the side covers.
POWER button
CD tray
OPEN/CLOSE button
ATTENTION: Be sure to remove the CD tray fitting before removing the CD changer unit. 1. Press the POWER button. Press the OPEN/CLOSE button to eject the CD tray. 2. Move the CD tray fitting upward and release the joint b. 3. Press the OPEN/CLOSE button to insert the tray.
Joint b CD tray fitting
Fig.4
Removing the CD Tray fitting (See Fig. 5 to 7)
- How to eject the CD tray without turning on power 1. Turn the black loading pulley gear marked c from the back of the CD changer unit as shown in Fig.7 and draw the CD tray toward the front. 2. Move the CD tray fitting upward and release the joint b. 3. Push and insert the CD tray manually.
Joint b