|
|
|
Categories
|
|
Information
|
|
Featured Product
|
|
|
 |
|
|
There are currently no product reviews.
 ;
Being a user of older radios of many kinds, preferring them over more modern rigs, this manual was invaluable in the programming of my two. I now know for certain what the assorted buttons functions are, and am very grateful to have found this excellent site. Many thanks for your assistance, Tony.
 ;
Clear and easy to read. All details as expected. Price acceptable , and quick delivery.
;
Quick response and exactly what I was looking for and at a great fair price!
;
5 star quality on these downloadable manuals. Easy to read and all the information is there. A must when doing a custom install or needing to service your precious old school electronics.
;
So usefull to make my installation a breeze. 5 stars on quality.
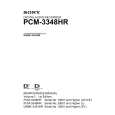
2-3 Loading the Tape
Tape reels to be used
Use 14-inch, 12.5-inch or 10-inch tape reels and empty reels.
4 5
Turn the take-up reel to eliminate slack. Press the tension disarm switch or the STOP button of the PCM-3348HR.
Loading the tape
Chapter 2
Use the following procedure to load the tape.
This applies tension, and the tape is then in the loaded state. The STOP button changes from flashing to continuously lit.
Caution
1
Aligning the reels so that the slot in the hub fits over the projection on the spindle, mount the tape reel and empty reel.
If there is slack in the tape when it is loaded, this can cause damage to the tape or the tension arms. Recording the whole length of a previously used tape or using the tape reversed In these cases it is essential to use advance recording, or to prestripe the tape before use.
ITAL DIG
Fit the slot over the projection
S
ONY
2 3
Turn the spindle knob clockwise until it stops to fasten the reel. Thread the tape as shown in the figure.
2
SONY DIGITAL
4 23
SONY DIGITAL
5
2-8
Chapter 2 Preparations
|
|
|
> |
|
|
Parse Time: 0.183 - Number of Queries: 100 - Query Time: 0.035