|
|
|
Who's Online
There currently are 5897 guests online. |
|
Categories
|
|
Information
|
|
Featured Product
|
|
|
 |
|
|
There are currently no product reviews.
 ;
Thank you for providing this manual and at low cost.
The Philips scope is of excellent quality, longevity and build and had a couple of faults
when it was passed to me. Having the CCT diagrams is a blessing.
I have fixed the problems and also modded the scope to my requirements.
I have built a 24v Li-Ion pack for portable use from old but good laptop batts.
it is working beautifully and I am well pleased. Keep up the good work Guys.
 ;
manual was very helpful in learning how to propery use my washer. I could not find this manual anywhere else.
;
Awesome quality manual. You really saved my bacon with this one. Was looking for some specific information with regards to my "new" vintage VCR that didn't come with the owners manual. This site is truely a goldmine of available manuals. The quality of the scans are top notch.
Thank-you so much for this awesome manual. If you're looking for this Sony SL-HF400 owners manual, this is the one you NEED to buy. Definitely worth the money.
;
The manual was made available promptly. I is a clean scan of the original. I had no problem downloading it. The scan was well centered and cleanly formatted. It is as good a product as can be had without being the original document.
;
Received downlink in less then 8 hours, Item was in good copy condition, and told me how to program the clock timer. The price was very resonable, and the process was very automated and was GREAT to work with.
Adjusting
the oven temperature
control
Although your new oven is properly adjusted to provide accurate temperatures, it may cook faster or slower than your old oven. If, after using the oven for a period of time, you are not satisfied with the baking/roasting results, you can change the temperature calibration by following these steps:
Single/upper
oven:
1. Push the Bake pad and hold for 4 seconds. The display will show the current offset temperature, for example �OO�, if you have not previously adjusted the temperature. 2. To adjust the temperature, use the Temp pad(s). Push A to raise the temperature or V to lower the temperature in 5°F increments. You can set the temperature change to as low as -35°F or as high as +35�F. A minus (-) sign will appear before the number when decreasing the temperature setting to show the oven will be cooler by the displayed amount. 3. After making the desired adjustment, push any command pad to enter the new offset temperature.
Lower
oven
(double
ovens):
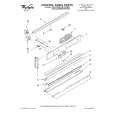
1. Make sure the Oven Temperature Control Knob is turned to the off position. Pull knob straight off and flip it over.
2. Loosen the locking screws inside the control knob. Note the Position of the notches. 3. To lower the temperature, hold knob handle firmly and move the tooth a notch counterclockwise. Each notch equals about 5°F (2.5%). 4. To raise the temperature, hold knob handle firmly and move the tooth a notch clockwise. Each notch equals about 5°F (2.5%). 5. Tighten the locking screws and replace the control knob.
Locking
.Th
Notches
14
|
|
|
> |
|