|
|
|
Categories
|
|
Information
|
|
Featured Product
|
|
|
 |
|
|
There are currently no product reviews.
 ;
It is perfect, exactly what we needed. It's like the paper version but less clutter.
 ;
Received my manual within 24 hours. Very clear scan of the manual I needed. Thanks!
;
Very clear scan, I recommend it. Definitely a must have for any 3362 owner.
Alpine could have written a slightly more complete manual, though. It's already pretty huge, but the unit has so many functions, I feel some more explanation would have been better.
Yamaha's manual of their comparable YDSP-1 is a little better in my opinion.
;
Immediate response with excellent service - highly reccommended
;
Correct manual received and of good quality but the contents of the file for the Service Manual for the same monitor is for a 20" TV not the RGB Monitor.
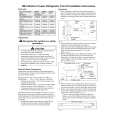
3 Press OPEN/CLOSE on DECK A (one of
the DISC 1-5 A buttons for RCDW500C) and place a CD on the disc tray. Press OPEN/CLOSE (or A) on DECK A again to close the disc tray.
Normal speed SynchroRecording
The disc is recorded at the same speed as the playing CD. You can hear the sound during recording. To use Make-Disc SynchroRecording, set �Make Disc� in the Setup Menu to �On� beforehand (page 35). When using the remote, set DECK A/DECK B to DECK B.
When you perform Make-Disc SynchroRecording, the current disc in DECK A is used to record. When you perform Synchro-Recording, you can choose the disc which you want to record, and the play mode. If you select �ALL DISCS� even though you want to record only one disc, discs you did not intend to record may be recorded.
4 Press CD SYNCHRO HIGH.
DECK B stands by for recording, and DECK A stands by for playing.
CD SYNCHRO NORMAL x H
5 After �New Track� appears in the
display, press H on DECK B to start recording.
DECK A/DECK B
High-Speed Synchro-Recording starts. DECK A and DECK B automatically stop after recording.
To stop recording
Press x.
H
Notes
CD SYNCHRO NORMAL x
� When you make Synchro-Recording in programmed order, the recording speed automatically changes to Normal speed. You can perform only Normal speed Synchro-Recording. � If you select �ALL DISCS� even though you want to record only one disc, discs you did not intend to record may be recorded.
1 Do steps 1 to 3 of �High-Speed
Synchro-Recording� on page 23.
2 Press CD SYNCHRO NORMAL.
DECK B stands by for recording, and DECK A stands by for playing. When you place a CD-R or CD-RW in the deck, the unit optimizes itself for the best possible recording and �OPC� appears temporarily in the display. If �Not Blank� appears, make sure that the blank disc is placed correctly.
24
|
|
|
> |
|