|
There are currently no product reviews.
 ;
I am very happy with the owner's manual. I bought a used Casio and was so relieved that I was able to get a hold of a owner's manual. It was very easy to download the manual and I had no problems with printing it. Thank you! Nancy Whalen
;
The purchased manual is an high-quality scan of the original JVC paper-based Owner´s Manual. I am very satisfied!
;
Very satisfied with received document, all is right, Thank You very much, it was a Pleasure to work with You.
 ;
great site, the most easy and fastest way to find the manual you need, no 5 star because the manual was only available in german, but I speak german as well so no problem for me.
;
thanks for this download i got a pioneer bdp-lx70a blu-ray player and it had no manual i search everywhere on the internet and came across owner-manuals.com and i found that it was so easy to find and downloaded from this site if i ever need a manual again this would be the first place that i would come too thanks guys
Edit
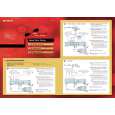
Select the method for dividing scenes.
DV10/11/02 1:30PM - 11/12/02
Chapter 2
Auto
Manual
Cancel
SYSTEM MENU </M/m/,, ENTER m/M
� To create scenes automatically Press </, to select �Auto,� then press ENTER. The recorder divides the generated program into scenes, and the Scene List menu appears. � To create scenes manually A Press </, to select �Manual,� then press ENTER. The display for setting the IN point appears. The scene starts to play in the background. B While watching the playback picture, press m or M to search for the IN point, then press ENTER. The IN point is set, and the display for setting the OUT point (end of the scene) appears. C While watching the playback picture, press m or M to search for the OUT point, then press ENTER. The OUT point is set, and the display asks whether to add the selected scene to the Scene List menu.
Scenes Selection
Do you want to capture the scene between IN 0:00:30 and OUT 0:00:52? OK Preview Cancel Change IN Change OUT
RETURN
x REC STOP
a Follow steps 1 to 7 of �Preparing for recording using the DV IN jack� (page 75), then press SYSTEM MENU.
Insert a DVD-RW (VR mode) into the recorder. Make sure that the disc has enough free space to record the contents of your tape.
b Press M/m to select �DV/D8 EDIT,� then press ENTER.
The DV/D8 Edit menu appears.
DV/D8 EDIT
Program Edit
Select only the scenes you want to copy from the DV/D8 tape.
Advanced Program Edit
� To preview the scene, select �Preview.� � To reset either the IN or OUT point, select �Change IN� or �Change OUT.� D Press </M/m/, to select �OK,� then press ENTER. A new Scene List menu appears with the selected scene. E Press </M/m/, to select �Add,� then press ENTER. The display for selecting the scene insertion point appears. F Press M/m to select the insertion point in the Scene List, then press ENTER. The display for setting the IN point (start of the scene) appears. G Repeat steps 2 to 6 to create all the scenes you want to add to the Scene List. You can add up to 50 scenes. � To quit editing Press </, to select �Cancel,� then press ENTER.
DV/D8 Edit List
c Press M/m to select �Advanced Program Edit,� then press ENTER.
The display asks whether to start recording.
DV/D8 Dubbing
Change the recording mode if necessary. Select "Start" to start dubbing. SP Start Cancel
If you want to change the recording mode, press </, to move the cursor, then press M/m to select the mode.
d Press </, to select �Start,� then press ENTER.
The recorder starts recording the tape contents. To quit recording, press x REC STOP. When recording is finished, the display asks if you want to create scenes within the generated program automatically or manually, or quit editing.
e To edit the Scene List, press </M/m/, to select a scene in the Scene List menu and press ENTER.
When the sub-menu appears, select an edit option you want to apply to the scene.
82
Advanced Program Edit
 $4.99 RDRGX7 SONY
Quick Start Quick start guide ( sometimes called quick guide ) contains most important information on how to use… 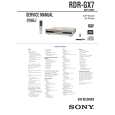 $4.99 RDRGX7 SONY
Service Manual Complete service manual in digital format (PDF File). Service manuals usually contains circuit diagr…
|