|
|
|
Categories
|
|
Information
|
|
Featured Product
|
|
|
 |
|
|
There are currently no product reviews.
 ;
This is an excellent handbook. We had no information on the appliance until we obtained this and are now able to use the appliance to its full potential. Strongly recommended.
;
Very happy to find this from owners-manual.com and the enclosed spec sheet as well.
Not longer available from Sony.
;
The Owner's manual was very helpful. The WEGA is about 35 years old and needed repair.
Your Website is pretty good und easily to handle.
Thank You
Carl-W. Lohmann
;
Perfect. Very good service and very good scanning quality. All sheets are very legible. Thank's
;
My first manual from Owner-Manuals.com but not the last! I am very satisfied with the easy ordering and promt delivery of a manual I did not find anywhere else.
Model
RTl8DK
and RTl8HD
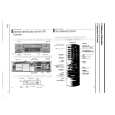
The meat drawer and cover can be removed for cleaning or moved to another shelf, if desired. Remove the meat drawer first.
To remove the meat drawer: 1. Slide the drawer straight out to the stop.
2. Lift the front. 3. Slide drawer out the rest of the way. 4. Replace in reverse order.
Lift the front, then the back.
To remove the cover: 1. Remove the meat drawer.
2. Tilt front of cover up. 3. Pull cover up and out.
To replace the cover: 1. Fit bottom notches of cover over rear and
center cross bars of shelf.
2. Lower cover into place. 3. Replace the meat drawer.
Pull out tx stop, lift the front and pull again.
Removing
the crispers
and crisper
cover
Pull out to the
To remove the crispers: 1. Slide the crisper straight out to the stop.
2. Lii the front. 3. Slide out the rest of the way. 4. Replace in reverse order.
To remove the cover: 1. For some models: Push up glass insert
from the bottom, then slide it out with both hands. 2. Lift front of cover frame. 3. Pull cover frame up and out. 4. Remove metal cover support.
Remove the Lift front of
To replace the cover: 1. Replace metal cover support on wall
supports in front section of cabinet. 2. Fit back corners of cover frame into notch supports on walls of refrigerator, then lower front onto metal cover support. 3. For some models: Slide back of glass insert into cover frame. Then lower front to level position. 12
|
|
|
> |
|
|
Parse Time: 0.168 - Number of Queries: 103 - Query Time: 0.033