|
|
|
Categories
|
|
Information
|
|
Featured Product
|
|
|
 |
|
|
There are currently no product reviews.
 ;
It's a good manual, this one it's a scan from the original factory service manual, great quality 100% readeable. definetely it worths what I paid for.
 ;
A good manual! fast service and good qualityi for pdf document.
thanks!
;
Very helpful and complete manual. Maybe only one negative is schematics have sometimes unreadable name of the parts. But it's not a big problem.
;
Excellent high quality schematics brought my old Heidelberg back to life. Fast download at a reasonable price. Thanks.
;
This document is just what I was looking for, it´s very useful, it contains adjustment procedures for the final stage of the power amp and also
has a complete wiring diagram and description of the main semiconductors used in the design.
TK-3202/3206
DISASSEMBLY FOR REPAIR
3. Attaching the antenna receptacle to the chassis.
Screw the antenna receptacle to the chassis in the order shown in the drawing so that the antenna receptacle comes to the center of the case hole.
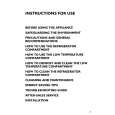
5. Screw sequence for mounting the TX-RX unit to the chassis.
Attach the TX-RX unit to the chassis using the screws in the order shown in the drawing below.
_ 8 _ 7 _ 5 _ 6 _ 9 _ 1 _ 4 _ 3
Tighten this screw first. Tighten this screw second.
_ 2
TX-RX UNIT Component side view
_ 10
_ 11
4. The nuts of the volume knob and channel knob
Note that the shapes, colors and heights of nuts of the volume knob and channel knob are different from one another. (The nut of volume knob is silver, and the nut of channel knob is gold) Use the following jig when removing the nuts of the volume knob and channel knob. � Jig (Part No. : W05-1012-00)
Volume Knob (Silver)
Channel Knob (Gold)
7
|
|
|
> |
|