|
|
|
Categories
|
|
Information
|
|
Featured Product
|
|
|
 |
|
|
There are currently no product reviews.
 ;
A comprehensive Operating and Service Manual. All schematics are complete and easy to read. The PCB drawings and complete parts list are very helpful. I would definitely recommend this manual.
;
SCANNING OF HIGH QUALITY
VERY, VERY HIGH VELOCITY DOWNLOAD
VERY GOOD PRICE,
TRUE SATISFIED, THANKS
;
Genuine Toshiba owner's manual. Couldn't really ask for more. And written in understandable English in contrast to a few recent experiences I have had with manuals for other equipment other than Toshiba but made in China and written in "Chinglish"!
;
I purchased a vintage Sony mixer off eBay and within the hour was able to locate and purchase the manual for it.I mean really,where else can you find a manual for a product made in 1983!? It was easy to find and purchase/download the manual I needed.I will use this site again for other equipment I have! Great site!
;
manual de usuario perfecto y completo de buena calidad de impresion y muy detallado ideal !
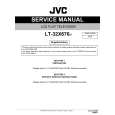
CONNECTIONS AND OPERATION
Amplifier Power switch
White Red
TT-15S1
7 Connections
Make sure that the power supply to both this turntable and the amplifier are OFF before you start connecting.
6. Lift the lifter lever, then use the head shell finger hook to
move the tonearm to the play position of the record.
7. Lower the lifter lever.
The tonearm slowly lowers the stylus onto the record, and the record starts to play.
1. Connect the PHONO cables (L: white, R: red) that are
connected to the toner arm to the corresponding L and R [PHONO] input terminals on your amplifier.
Caution
� Do not allow the turntable to be jolted or vibrated while playing a record. � Always stop the turntable when changing records. � Always turn down the amplifier volume when placing the stylus on or removing it from the record.
2. Connect both the ground wire that is connected to the
bottom of the turntable and GND cable that is connected to the toner arm to the GND terminal (ground terminal) on your amplifier.
3. Plug the motor power cord into an AC 120V outlet.
Caution
If your amplifier etc. has power outlets on the back panel, plug the turntable into one of these outlets. In this case, refer to the instruction manual for amplifier, etc. and check that the power outlet has enough power capacity.
7
When the record has finished
The tone arm raises, and the stylus separates from the record.
1. Gently raise the lifter lever.
2. Return the tone arm to the arm rest using the head shell
7 Operation
7
Starting to play records 1. Plug the turntable power cable into an AC outlet. 2. Turn on the amplifier, and select input to [PHONO].
Also, set the amplifier phono equalizer to either [MM] or [MC] to suit the attached cartridge. (If you are using the included cartridge, set to [MM])
finger hook.
3. Lock the tone arm in the arm rest. 4. Switch the power button OFF.
The turntable stops rotating.
3. Set a record on the turntable.
* If you are playing an EP record, use a commercially available EP adapter.
4. Attach the belt to the motor pulley in the correct position
for the chosen record.
5. Switch the power button ON.
The turntable will begin to rotate at the speed selected in operation 4 above.
Caution
In order to reduce noise, the motor torque has been set to the minimum level in this turntable. Therefore, the turntable sometimes does not rotate when the power is switched on. If this happens, gently rotate the turntable a little in the clockwise direction by hand.
11
|
|
|
> |
|