|
|
|
Categories
|
|
Information
|
|
Featured Product
|
|
|
 |
|
|
There are currently no product reviews.
 ;
The manual describes this product very good. It has the basic things to know and also a more detailed look. Very well made!
;
An excellent document to assist in the repair of my old personal tape player. It includes full circuit diagrams and physical layout drawings and full instructions on disassembly and fault finding.
Well worth the meagre price.
;
Very good conversation, Pretty fast Service, wood do it again,
Have paid by Paypal, so i got the Service Manual online after 15 Min.
Very helpfully.
Greeting from Germany,
Hans
;
Good-quality scans. Detailed description. I hope I can repair the machine.
;
High-quality scanning. Detailed description. Recommend for all technician. A+++
5
6
7
8
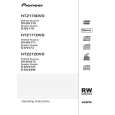
7. DISASSEMBLY
Note 1: Do NOT look directly into the pickup lens. The laser beam may cause eye injury. Note 2: Even if the unit shown in the photos and illustrations in this manual may differ from your product, the procedures described here are common.
A
Disassembly
1 Bonnet, Tray Panel
1 1 2 3 4 5 6 7
Remove the bonnet by removing the nine screws. Press the u STANDBY/ON button to turn on the power. Press the h OPEN/CLOSE button to open the tray. Remove the tray panel. Set the test disc. Press the h OPEN/CLOSE button to close the tray. (Test disc is clamped.) Press the u STANDBY/ON button to turn off the power. Pull out the Power cord. Test disc
B
4
3 2 5
Tray panel Tray
25 16
C
D
How to open the tray when the power cannot be on
1. Slide the rack, loading (White) toward the arrow direction by using a minus screwdriver to release the lock. 2. Manually open the tray. NOTE: Please strongly pushing rack, loading (White) to release the lock because the tray doesn't go out easily.
Minus screwdriver
E
Rack, loading (White) Tray open
F
Bottom view
XV-DV575
5 6 7 8
33
|
|
|
> |
|
|
Parse Time: 0.161 - Number of Queries: 100 - Query Time: 0.037