|
|
|
Who's Online
There currently are 6043 guests online. |
|
Categories
|
|
Information
|
|
Featured Product
|
|
|
 |
|
|
There are currently no product reviews.
 ;
Thank you for your manual It has the basic things to and i use the Oszi for Longer Time.
THX
;
Actually, I was looking for this information for 3 years!...now thanks to you, the manual is on my hands and of great help, cause I understand now where I was doing wrong connections and wires...excellent, I'll be back to you if in need, thank you.
 ;
This manual covers the main equipment features only. While it also includes the procedure for saving and loading from the now long obsolete memory cards it does not mention the how to operate with the optional floppy drive interface so I am still at a loss about how to use this! Note that there is a separate manual covering the MIDI interface and programming via the keyboard, not included in this download. You will also need to get hold of this if you want to use the MIDI interface properly. Basically there is little difference between this manual and the free to download manual for the similar PR60 model.
;
Good list of manuals. I found a very rare one and easily get. Should be promptly to download, as we must to wait hours even after confirmed payment.
;
The manual was properly scanned and perfectly readable. The only small problem is that I couldn't use my dear Ctrl + F to find a word I needed.
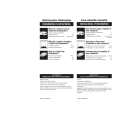
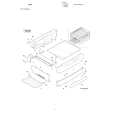
: LOADING COPY PAPER : KOPIERPAPIER EINLEGEN
: will blink in the copy quantity display when the paper tray or the bypass tray is empty (Z-830/Z-845 only) or when the paper has not been fed all the way in. Check the paper tray or the bypass tray. Also see the next page, MISFEED REMOVAL. The paper tray holds 250 sheets of paper. Copy paper of A5 and A4 sizes in the weight range of 56 to 80 g/m2 can be used. � For best results, use only Sharp recommended paper. Auf der Anzeige der Kopienanzahl erscheint ein blinkendes (:), wenn das Papierfach oder die Kassette für Mehrfacheinzug leer sind (nur Modell Z-830/Z-845) oder wenn das Papier nicht vollständig eingezogen wurde. Papierfach oder Kassette für Mehrfacheinzug überprüfen. Siehe auch PAPIERSTAUBESEITIGUNG auf der folgenden Seite. Das Papierfach fa�t 250 Blatt Papier. Es kann Kopierpapier der Formate A5 und A4 mit einem Gewicht im Bereich zwischen 56 und 80 g/m² verwendet werden. � Beste Ergebnisse werden mit den von Sharp empfohlenen Papier- und Foliensorten erzielt. 1. Papierfach vorsichtig anheben und herausziehen. WICHTIG: Sollte Papier aus dem Papierfach nicht richtig eingezogen worden sein, Papierfach zurückschieben und die Anweisungen auf der nächsten Seite zur Aufhebung eines Papierstaus befolgen. 2. Papierandruckplatte nach unten drükken, bis sie einrastet.
1. Gently lift and pull out the paper tray.
NOTE: If paper has misfed from the tray, push back the tray and refer to the instructions on the next page for misfeed removal.
2. Push the pressure plate until it locks in position.
3. Adjust the paper guides on the tray to the copy paper width and length. � Move the left guide to the appropriate slot as marked on the tray. � Squeeze the lever of the front guide and slide the guide to match with the width of the paper.
3. Papierführung des Papierfaches an die Länge und Breite des Kopierpapiers anpassen. � Linke Führung bis zum passenden Schlitz entsprechend der Markierung auf dem Papierfach schieben. � Entriegelungshebel an der vorderen Führung drücken und Führung verschieben, bis sie auf die gewünschte Papierbreite eingestellt ist. 4. Kopierpapier auffächern und in das Papierfach einlegen. � Die Papierkanten müssen sich unter den Haken an den Ecken des Papierfaches befinden. Kein Papier über die Markierung für die Stapelhöhe einlegen. � Papierführung überprüfen und, falls nötig, nochmals anpassen. 5. Papierfach fest in den Kopierer zurückschieben. � Durch Drücken der Löschtaste (>) erlischt die blinkende Anzeige :, ohne da� kopiert werden mu�.
D GB
4. Fan the copy paper and insert it into the tray. � Make sure the edges go under the corner hooks. Do not load paper above the maximum height line. � Check the paper guides and adjust them again if necessary. 5. Push the paper tray firmly back into the copier. � To cancel the blinking : without restarting copying, press the clear (>) key.
© Hooks © Haken
3 � 12
 $4.99 Z-845 SHARP
Parts Catalog Parts Catalog only. It's available in PDF format. Useful, if Your equipment is broken and You need t… 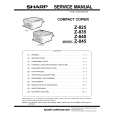 $4.99 Z845 SHARP
Service Manual Complete service manual in digital format (PDF File). Service manuals usually contains circuit diagr…
|
|
|
> |
|